Lemon Love

meyer lemon curd

January 17, 2012

Growing up my sister absolutely adored lemon curd. My mum would buy boxes of mini lemon curd tarts for her to take to school in her lunchbox every single day.

I wasn’t head over heels for straight up lemon curd as a child although I was always partial to a slice of lemon tart. However my grown up taste buds LOVE this stuff – as they love all things citrus – and really, what’s not to love?

If you’ve never experienced lemon curd (which I admit has a bit of a funny sounding name) you’re in for a real treat. And contrary to my expectations, it is incredibly easy to make.

What you’ll end up with is a thick, tangy-sweet, incredibly yellow, very lemony preserve perfect for spreading on toast or a good hunk of bread, or for pouring into a pie crust for a killer lemon curd tart.

I looked at a bunch of different recipes – David Lebovitz’s seems to be popular – but I really liked Nigel Slater‘s. Since Meyer lemons tend to be much sweeter than conventional lemons I reduced the amount of sugar here but it’s still wonderfully sweet – so much so that I can’t seem to stop taking giant finger-swipes from the jar. Addictive to say the least.

Meyer Lemon Curd
from Nigel Slater via The Guardian

Ingredients

  • zest and juice of 4 unwaxed Meyer lemons (if using regular lemons, increase the sugar to 200g)
  • 160g sugar
  • 100g butter, cut into cubes
  • 3 eggs and 1 egg yolk, mixed gently with a fork

Directions

  1. Set a heatproof bowl over a pan of simmering water, being careful that the bottom of the bowl does not touch the water. Place the lemon zest and juice, sugar and butter into the heatproof bowl. Stir with a whisk from time to time until the butter has melted.
  2. Stir the eggs and egg yolk into the lemon mixture. Let the curd cook, stirring regularly, for about 10 minutes, until it is thick and custard-like. It should feel heavy on the whisk.
  3. Remove from the heat and stir occasionally as it cools. Pour into very clean jam jars (mason jars) and seal. It will keep for a couple of weeks in the refrigerator. Makes 2 small jam jars.


meyer lemon cake

January 11, 2012

I believe citrus to be the saviour of winter. Just when you’re starting to get depressed about the lack of all things fresh and bright (and a teeny bit bored of squash), along comes citrus season.

It starts with satsumas, which we’ve been eating constantly all December and January, a big, full bowl in our dining room ever since I spotted them in the grocery store.

If you can get your hands on a Texas Red Ruby grapefruit you’ll be incredibly happy you did. I always eat grapefruit with sugar sprinkled on top, to mellow out the sourness, but these need not a grain of sugar. They’re so sweet – still sour – but sweet! And bursting with juice. Just gorgeous.

Then there are blood oranges. Just read this blog post I wrote last year about this blood orange olive oil cake and you’ll see what all the fuss is about.

And…meyer lemons. So much more yellow than their conventional counterparts and rounder too. Pick one up and smell it, breathe it in, and remember that winter isn’t the barren season we sometimes think of it as. Thank goodness for citrus.

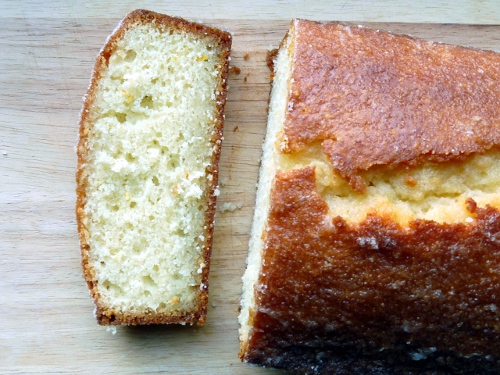
This cake is described in the original recipe as “the best damn meyer lemon cake” which… made me laugh. I haven’t made another meyer lemon cake to be able to compare but I’ll say this: it’s a damn good cake.

It’s a do-ahead job since you want the cake to sit for a whopping 24 hours before serving. I know. I blinked as well. But there’s a good reason and that is the super-addictive lemon-sugar glaze which spends a day seeping through the cake as it sits. Once you get to slicing it, it will be an entirely different cake than if you skipped this step.

The result is bright, zingy, moist, with with a sharp-sweet crust coating every slice.

The best damn meyer lemon cake – otherwise known as how to make friends in wintertime. Enjoy.

Meyer Lemon Cake
adapted from Maida Heatter via Saveur

Ingredients

  • 1 tbsp butter, plus 8 tbsp melted
  • 1/2 cup whole blanched almonds
  • 1 1/2 cups flour, plus 2 tbsp to dust pan
  • 1 tsp baking powder
  • 3/4 tsp fine salt
  • 1 1/3 cups plus 2 tbsp sugar
  • 2 eggs
  • 1/2 cup milk, at room temperature
  • 2 tbsp lemon extract
  • Zest and juice of 2 meyer lemons

Directions

  1. Heat oven to 350F. Grease a loaf pan with 1 tbsp. of the butter and dust it with 2 tbsp flour. Tap out the excess and set aside. In a food processor, grind the almonds until very fine then set aside.
  2. In a bowl, sift together flour, baking powder, and salt and set aside.
  3. Put the melted butter into a large bowl and add 1 cup of the sugar and mix until combined. Add the eggs, one at a time, beating just long enough to incorporate each one.
  4. Add the flour mixture and milk mixture in 3 batches, beginning and ending with the flour. Beat until mixed after each addition, scraping down the sides of the bowl with a rubber spatula. Mix in the lemon extract. With the spatula, fold in the lemon zest and ground almonds. (The mixture will be thin.)
  5. Turn batter into your prepared pan and bake until a toothpick inserted in the center of the cake comes out clean and dry, about 65 minutes. Transfer the pan to a cooling rack.
  6. Prepare the glaze: Combine remaining sugar and lemon juice in a small saucepan over medium heat and cook, stirring, until sugar is dissolved, about 2 minutes, but do not let it boil. Brush the glaze over the hot cake. (The excess liquid may pool along the sides of the pan; it will absorb completely as it sits.) Once the cake has absorbed all the liquid, turn it out of the pan and allow it to cool upright on a rack.
  7. Once it’s cool, wrap the cake with plastic wrap and let stand at room temperature for 24 hours before serving.

I fell in love with the idea of this meal over a week ago and set my heart on making it. Then a week of intense summer heat and humidity happened and there was simply no way in hell I was going to let my oven run at 350F for an hour and a flipping half.

Yet, still I craved the fall-apart braised chicken, the creamy beans, the lemony brightness, and another excuse to use that forest green mint pesto*.

Beans are soaked overnight, then drained and set aside while you cook up some onion and garlic in olive oil. The beans mix in along with some lemon peel and juice.

Chicken thighs are seasoned and loaded on top of the beans with fresh thyme. The whole pot is brought to a simmer (breathe it in) in water before you pop it in the oven to do its thing.

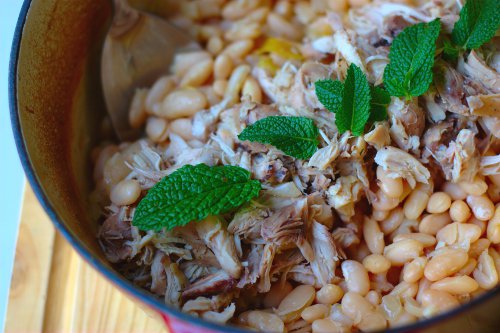
After an hour and a half of cooking, when the beans are creamy and tender beyond belief, you pull it out and add more lemon before removing the chicken.

Once shredded, the chicken is returned to the pot and a lovely dollop of mint pesto is added.

*I had every intention of using the mint pesto I made last week but sadly when I retrieved it from the fridge, it had gone bad. Super sad. Luckily, this dish stands up perfectly well on its own, but if you can then surely make the pesto. I left it in the recipe knowing how much creaminess , texture, and flavour it could potentially add. This makes a healthy, hearty Summer supper full of wow. Yep, that’s a real thing.

Lemon Braised Chicken + Beans with Mint Pesto

adapted from The Kitchn

serves 6 to 8

  • 1 pound dried small white beans, such as flageolet
  • 2 tablespoons olive oil
  • 4 cloves garlic, minced
  • 1 small white onion, diced
  • 2 lemons
  • 2 pounds boneless skinless chicken thighs
  • Coarse salt and freshly ground black pepper
  • 4 sprigs fresh thyme
  • Several tablespoons of mint pesto, to serve
  1. Place the dried beans in a large bowl and cover them with water. Soak for 24 hours, or at least overnight — topping up the water as the beans soak it up. Drain the beans and set aside.
  2. Heat the oven to 350°F. In a 4-quart (or larger) Dutch oven or heavy ovenproof pot, heat the oil over medium heat. Add the garlic and onion and cook for 5 to 7 minutes, stirring frequently, until they are tender and the onion is nearly translucent. Add the drained beans and stir to coat the beans with the garlic, onion, and oil. Turn off the heat.
  3. Take a sharp vegetable peeler and carefully peel one of the lemons. Peel it in wide strips, taking care that you remove only the top yellow layer of peel — you do not want any of the bitter white pith. Add all of this shaved lemon peel to the beans and stir. Juice the lemon and add the juice to the beans. (Reserve the second lemon for later.)
  4. Pat the chicken dry, and lightly salt and pepper it. Lay it on top of the beans in the Dutch oven. Add water until it covers the beans and comes up to just below the chicken. Lay the thyme sprigs on top. Turn the heat to high and bring the water to a simmer. Cover the pot and put it in the oven.
  5. Bake for 1 1/2 hours, or until the beans are very tender and creamy.
  6. Remove the lid from the pot, and take out the chicken and put it to the side on a plate. Remove the thyme stalks. Zest and juice the second lemon, and stir the zest and juice into the beans. Shred or chop the chicken and place it back on top of the beans. Top with the mint pesto (recipe here) and serve.
  7. To serve, scoop up a spoon of beans, and top with chicken. Make sure each serving has a dollop of pesto as well. Serve with a green salad, and good bread to soak up the sauce.